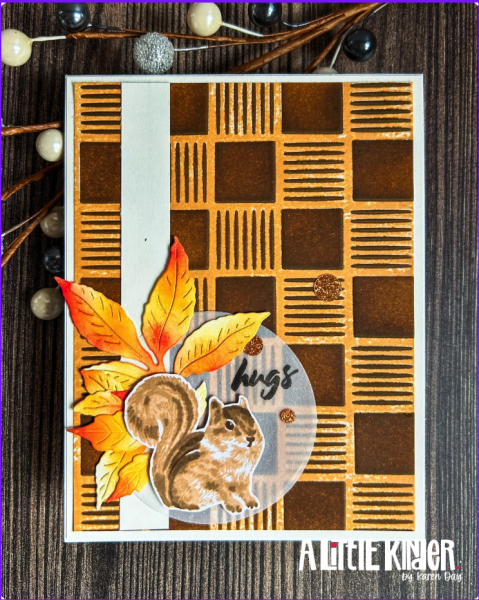 This card makes me smile every time I look at it. It has that cozy fall vibe, a touch of masculine energy, and just enough cuteness from that little Altenew chipmunk to keep everything feeling warm and welcoming. I knew the moment I sat down that I wanted to use my blackout stenciling technique again, and this plaid stencil from Altenew was the perfect choice. It’s one of those background stencils I added to my stash because I could immediately see how versatile it would be—especially for more masculine cards, fall cards, or anything that needed a strong pattern to anchor the rest of the design.
Let’s talk about blackout stenciling again, because it really is becoming one of my favorite techniques. It’s simple, but the effect is so rich and unique. Instead of doing the traditional method where you blend ink through the stencil onto the cardstock, blackout stenciling works the opposite way. You apply the ink directly onto the stencil itself. For this card, I laid the stencil flat and blended ink right onto the surface using warm browns to keep that autumn feeling strong.
Once the stencil was fully inked, I taped the top edge of it to my cardstock panel to create a hinge. This step is important because it lets you lift the stencil up and put it back down in the exact same spot if you need to add more ink. When everything was ready, I closed the stencil down over the cardstock and ran the panel through my die cutting machine. Instead of cutting anything, the pressure transfers the ink from the stencil to the paper. The result is this gorgeous, reverse-style pattern that feels softer, more blended, and almost velvet-like in texture.
After I created the blackout panel, I went back in with traditional stencil blending on top of it. Using the same stencil and the same warm brown inks, I added a second layer of depth to the pattern. That combination—the blackout transfer as the base and the crisp stenciled lines on top—creates a really dimensional look even though the card is perfectly flat. It’s such a cool effect, and it works beautifully with stencils that have linear or geometric designs.
With the background done, I focused on the embellishments. The leaves are ink blended with yellows, oranges, and reds to carry that autumn palette across the card. I love how the warm tones of the leaves contrast against the darker brown squares in the background. They feel bright without being overwhelming. The chipmunk is one of my new favorites from Altenew. He brings so much personality and softness to the design and pairs really well with the earthy tones.
To give the sentiment a place to sit, I added a vellum circle—just enough transparency to let the background peek through without losing the clarity of the stamped word “hugs.” A few glitter dots finished the card with just a bit of sparkle, but not so much that it takes away from the cozy, rustic feel.
This is one of those cards that came together exactly the way I pictured it in my head. The blackout technique shines, the stencil does the heavy lifting, and the chipmunk brings the charm. If you’ve been curious about trying blackout stenciling, this is the perfect stencil style to start with. Strong lines, repeating patterns, and bold shapes all work beautifully with this method.
If you want to see the quick IG version of this card or save it for later, you can check out the post here:
https://www.instagram.com/p/DQ-BOkHket_/?img_index=1
I hope this inspires you to play with your stencils in a new way. You never know—blackout stenciling might become your new favorite, too.