Hey y’all!!
It’s time for another Beyond the Paper Pumpkin box! And did you notice that it’s still June and I’m posting this! LOL. I’m surprised too, as it would seem that most things worked in my favor this month. Let me start out by saying if you don’t get a monthly box kit this one is a great one to get. It’s always card or project focused. Everything comes ready for you to punch out, stamp, and assemble. You get a mini stamp pad called a Stampin’ Spot and an exclusive stamp set in every box. This month we got 2 Stampin’ Spots!
I have made 5 cards for you today using just the stamp set from the June Paper Pumpkin box. This month’s box coordinated with a set in the Annual Catalog (it’s actually the set featured on the cover!) called Expressions in Art. This suite has a stamp set, die, matching DSP and an ephemera pack with gold accents. The DSP (pattern paper) is embossed with gold foil. It is STUNNING! (Page 96-97 in the catalog).
This month I decided to use the Expressions in Art DSP with the Paper Pumpkin stamp set since they were designed to work together. I did not add the stamp set (Artistically Inked) or the dies (Artistic dies) on my projects. There will be a process video added at the end of this post, or you can find it on my YouTube channel.
Let’s dive into the cards!
Details for today’s card
Card 1 uses Mojo Monday sketch #558 as the starting point. The card base is a standard side folding A2 card using Evening Evergreen cardstock. My first layer is 1/8″ bigger than what is listed in the sketch. Other than that little change I pretty much followed the sketch. The flower image is from the Paper Pumpkin kit, stamped in basic Gray ink and then stamped over with the “ink splot” stamp in Pale Papaya. I love that this was a super easy way to color that image. The Hello is from the Biggest Wish set (now a staple and considered to be a “basic” supply in my crafty corner). The sequins are the Artistry in Bloom sequins. I love them with the color combination! I also added a little Wink of Stella over the flower petals.
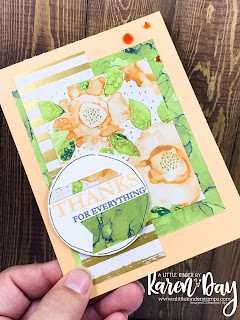
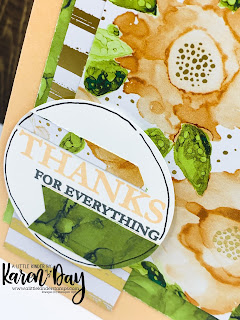
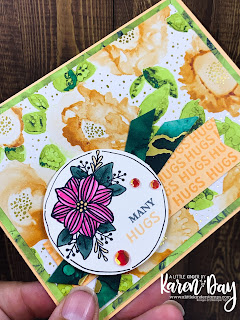
Card 2 also started from a Mojo Monday sketch (#547) but quickly got derailed. That happens right? I had cut everything to the sketch measurements but when I went to put the card together it just didn’t want to be that sketch anymore. I want to take a closer look at that circle… It’s a 2 1/5″ circle but it was a bit small for the greeting but changing the circle size looked weird on the card. So I added some DSP strips to take up the extra space. I LOVE how it turned out. Another suggestion when using sketches is to change the shape if it isn’t working, make it a die cut or different shape. I wanted to circle shape but needed something to take up the space. This was my solution.
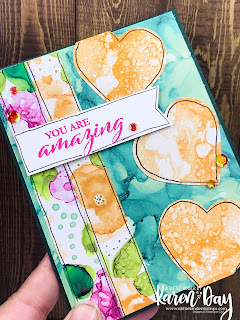
Card 3 is an OWH sketch that I have wanted to use over and over. I’ve gotten it out and looked at it for so many projects but just never actually used it, until today. The sketch is OWL 103. I love the little heart sprinkled down the side! I don’t have a heart punch that small and I really didn’t want to dig through dies to see if I had one that would work, so I went with the smooth edged heart from the Heartfelt Punch pack. It’s a little big but I LOVE how the is card turned out! I used the new Polished Pink to stamp You are Amazing and then a Basic Black Stampin’ Write marker to outline the shapes. Being completely honest, I prefer to outline with an American Crafts Precision Pen but y’all when I moved the crafty corner I misplaced them! UGH! I hate moving but I am loving my new home and the Stampin’ Write marker was a great substitute.
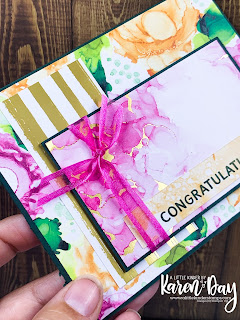
Card 4 is an old stand by layout. I seem to use this one a lot and I’ve seen it in many ways in many sketches. The idea is a strip of paper that runs top to bottom of the card with a large rectangle layered over it. I am really loving how the Evening Evergreen color is acting almost like black in these cards. It’s moved from being a color into to being a neutral. The sentiment on this card is stamped onto one of the DSP scraps in that Evening Evergreen and then I used the Treasured Tags Pick a Punch to round the end. I layered the Polished Pink ribbon over the edge. I really love how this card shows off that DSP and it could be used with just about any paper out there! (I have a couple of videos planned using pattern paper that I will have to put this to the test!).
And card 5 is a Saturday Sketch #665 card. I wanted to challenge myself to use a sketch that I would define as minimalist. And this one fits that description! I love how it allowed me to show off more of the DSP. I love this floral paper in Pale Papaya with all the gold accents! It is stunning and perfect to showcase on a card. The focal image in the lower left corner of the card is the floral image from the Paper Pumpkin kit stamped in Tuxedo Black ink and then colored with Stampin’ Blends.
Here are the sketches that I used for todays cards:
YouTube Video
Products Used:
Are you in the United States? I would LOVE to be your Stampin’Up! Demonstrator!
If you are in the United States and not currently working with a Stampin’ Up! Demonstrator, you can order supplies in my online store, here.
Post Views: 1,275


 Specialty Designer Series Paper")


